Drawing Flames Tutorial Description

The image is a detailed tutorial on drawing flames, presented in Chinese, with a watermark indicating the source as “Artman” (dated 2012). The tutorial provides a step-by-step guide to creating dynamic flame illustrations, focusing on structure, movement, and refinement. It features a combination of diagrams, annotations, and example sketches, making it a valuable resource for artists looking to add fiery elements to their work. The layout is organized into two main sections: a step-by-step process at the top and example flame drawings at the bottom, with accompanying text explanations in Chinese.

Step-by-Step Process for Drawing Flames
The top section illustrates the process of drawing flames using a structured approach, depicted through three progressive diagrams and detailed annotations in Chinese:
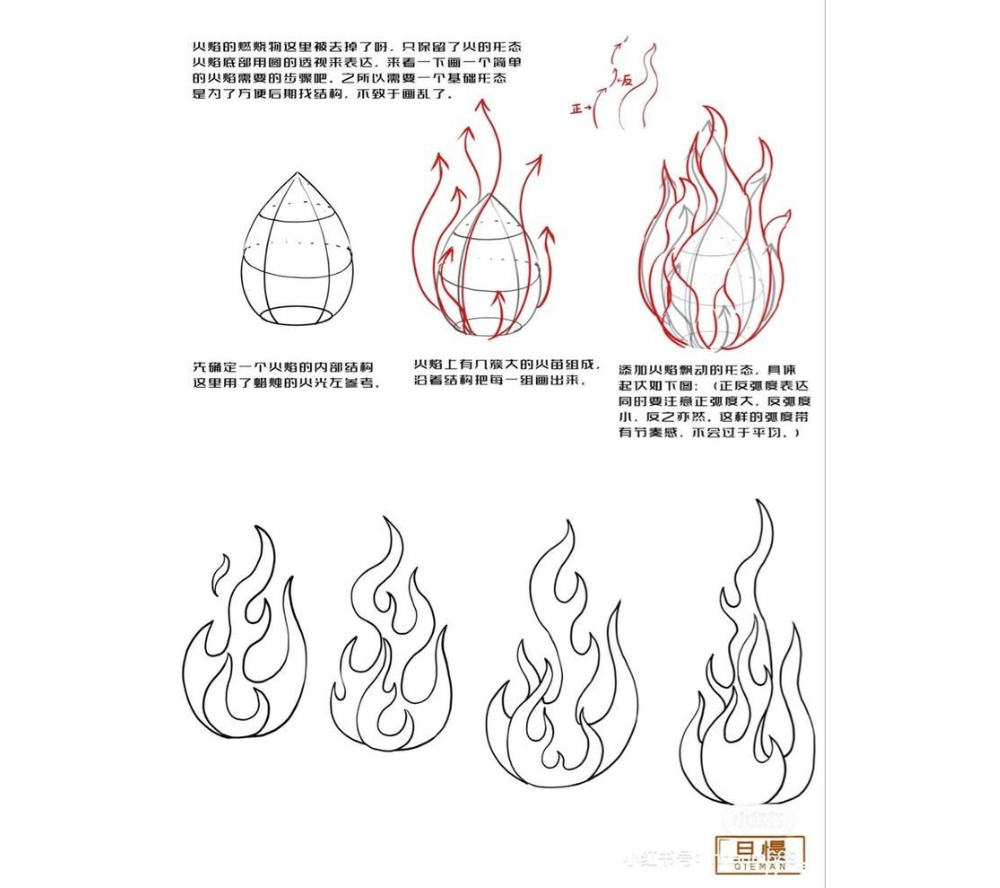
- Initial Structure (Teardrop Shape): The first diagram shows a teardrop-shaped outline with a grid-like structure inside, representing the flame’s core volume. The text explains that before drawing, one should observe real flames, noting their color, shape, and movement, as flames have a three-dimensional structure. It advises imagining the flame as a single cohesive shape rather than separate parts.
- Adding Flow and Direction: The second diagram builds on the teardrop shape by adding flowing lines around it, indicating the flame’s movement. Arrows show the direction of the flames, with the text noting that flames have an internal structure and suggesting the use of a single line to capture their flow. This step emphasizes imagining the flame as a three-dimensional object with a sense of direction.
- Refining the Flame Shape: The third diagram refines the flame, adding more detailed, wavy lines to create a realistic effect. The text highlights that flames seen from above appear larger, while those viewed from the side appear more stretched. It advises observing real flames (e.g., from a lighter or candle) to understand their shape, flow, and density, and to use cloud-like shapes for smoke to enhance realism.
Example Flame Drawings
The bottom section features four example flame drawings, showcasing the application of the technique:
- The flames vary in size and shape, ranging from a small, compact flame to larger, more spread-out ones.
- Each flame is drawn with flowing, wavy lines, capturing the dynamic nature of fire, with thicker lines at the base and thinner, more delicate lines at the tips.
- The text advises starting with a single flame shape, then using that as a reference to draw a group of flames, ensuring the overall shape remains cohesive.
Translation of Key Text
The Chinese text provides detailed guidance:
- Top Section: “Before drawing, observe real flames, noting their color, shape, and movement. Imagine the flame as a whole, not separate parts. Flames have a three-dimensional structure. Imagine the flame’s internal structure and use a single line to capture its flow. Start by using the structure to determine the flame’s shape.”
- Middle Section: “First draw a single flame’s internal structure, then use that to draw a group of flames. When viewed from above, flames appear larger; from the side, they appear more stretched. Observe real flames (e.g., lighter, candle) to understand their shape, flow, and density. Use cloud-like shapes for smoke. Consider the flame’s shape, flow, density, and use cloud-like forms for smoke if needed.”
Connection to Previous Guides
This flame-drawing tutorial complements the earlier posts in your series by continuing the theme of skill-building across disciplines:
- Woodworking, Measuring, and Welding Tools: The dynamic nature of flames ties directly to the welding tools guide, which included a torch—a tool that produces flames. Understanding how to draw flames can enhance an artist’s ability to depict welding scenes realistically. The precision in observing flame shapes also mirrors the accuracy required in woodworking (e.g., using a tape measure) and measuring (e.g., using a protractor for angles).
- Pterosaur Fossil: The scientific observation of real flames parallels the meticulous study of fossils, both requiring an understanding of form and structure.
- Beginner Art Lessons by JeYRam and Shozart/Loomis Head Drawing Tutorials: This tutorial builds on the artistic foundation established in the previous drawing lessons. While JeYRam’s guide taught combining shapes to draw a dresser, and Shozart/Loomis focused on head construction, this tutorial introduces organic forms (flames) using a similar structured approach—starting with a basic shape (teardrop) and refining it into a complex form.
Educational Value and Context
This tutorial, credited to Artman (2012), is a practical resource for artists seeking to master the depiction of flames, a common element in dynamic illustrations like fantasy, action, or nature scenes. The emphasis on observing real flames and using a structured approach aligns with the broader theme of precision and observation seen across your website’s content, from crafting to scientific illustration. The step-by-step process and example drawings make it accessible for beginners while offering insights for more advanced artists.
Captured as of 08:24 AM EDT on Friday, June 06, 2025, this tutorial adds a fiery dimension to your collection, bridging artistic techniques with the practical applications of fire in crafts like welding.